
How Ultimate Oreo Brownie Bars Became My Go-To Comfort Dessert
Ultimate Oreo Brownie Bars came into my life during a time when I craved desserts that felt generous and familiar. Pregnancy shaped my baking in unexpected ways. I didn’t just want something sweet. I wanted layers, contrast, and that sense of comfort you get from classic flavors combined in one bite. Ultimate Oreo Brownie Bars checked every box.
Just like other comfort desserts and layered bar recipes I return to often, these bars became part of my rhythm. I baked them when emotions ran high and when quiet moments felt rare. Ultimate Oreo Brownie Bars turned baking into a pause, not a task.
Why Brookie Layered Bars Feel So Special
Brookie Layered Bars stand out because they remove the need to choose. Brownies bring depth. Cookies bring warmth. Oreos bring contrast. When layered together, they create balance. Ultimate Oreo Brownie Bars don’t rely on decoration or complexity. They rely on texture and familiarity.
Each layer plays a role. The brownie base anchors the bars. The Oreo layer adds structure and crunch. The cookie layer softens everything with sweetness. That contrast mirrors what I love about classic homemade desserts and mixed-texture treats. Brookie Layered Bars feel nostalgic yet exciting at the same time, which explains why Ultimate Oreo Brownie Bars always earn a place on my table.
Before You Begin – Here’s What You’ll Need :
Ultimate Oreo Brownie Bars Layers Explained
Brownie Layer for Ultimate Oreo Brownie Bars
Ultimate Oreo Brownie Bars start with a brownie layer that sets the foundation for everything above it. I always aim for a fudgy texture rather than a light one because it holds the layers without crumbling. Melted butter, cocoa powder, and just enough flour create a base that feels rich but steady. This balance matters because Ultimate Oreo Brownie Bars need structure without turning dense.
As you mix the brownie batter, the texture should look smooth and slightly thick. Overmixing can tighten the crumb, so I stop once everything blends. That approach keeps the brownies soft even after cooling. When I pour the batter into the pan, I spread it evenly to prevent thin edges. If you enjoy dependable bar desserts or classic chocolate-forward bakes, this brownie base will feel familiar and reliable.
Print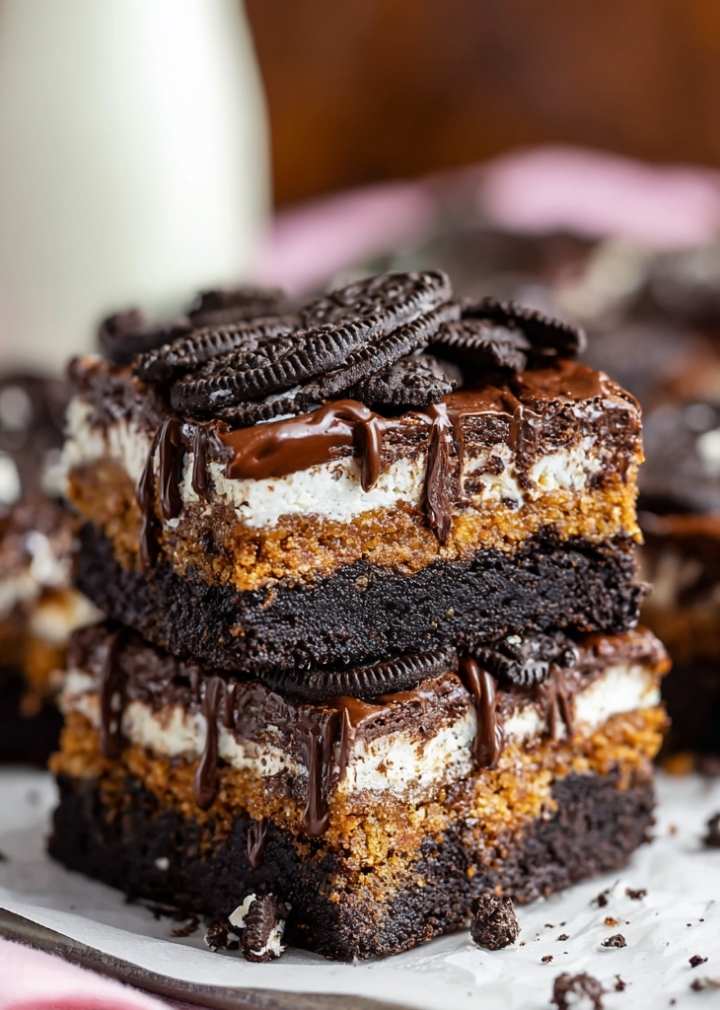
Ultimate Oreo Brownie Bars (Brookie Layered Bars)
- Total Time: 1 hour 15minutes
- Yield: 24 1x
Description
Layered Oreo Brookies – a triple decker treat of fudgy brownies, a layer of Oreo cookies, and a chewy chocolate chip cookie topping. Baked in a 13×9 inch pan, these indulgent bars are perfect for sharing.
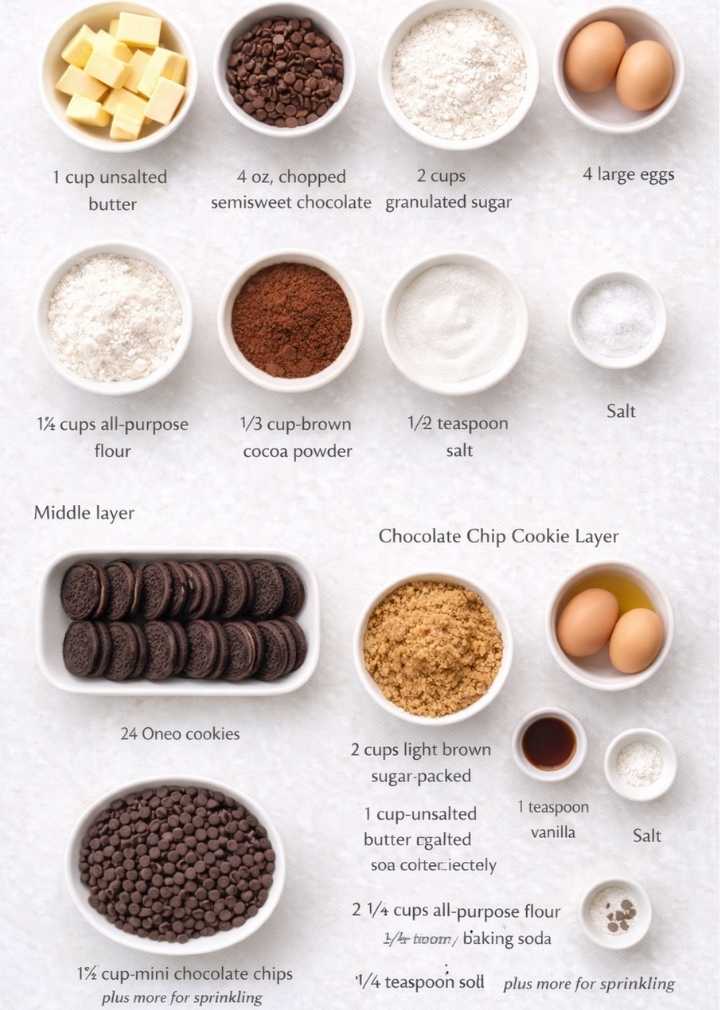
Ingredients
Brownie layer
1 cup unsalted butter
4 oz. chopped semisweet chocolate
2 cups granulated sugar
4 large eggs
1 1/2 cups all-purpose flour
1/3 cup unsweet cocoa powder
1/2 teaspoon salt
Middle layer
24 Oreo cookies
Chocolate Chip Cookie Layer
2 cups light brown sugar packed
1 cup unsalted butter melted and cooled slightly
2 large eggs
1 teaspoon vanilla extract
2 1/2 cups all-purpose flour
1/4 teaspoon baking soda
1/4 teaspoon salt
1 cup mini chocolate chips plus more for sprinkling
Instructions
Brownie layer
1. Preheat the oven to 350°F. Grease a 13×9 inch baking pan and line with parchment paper that overhangs to sides. (You can also use foil – if you do grease it also.)
2. Place the butter and chopped chocolate in a large microwave-safe mixing bowl. Microwave at 100% power in 30 second increments until the mixture is incorporated and can be stirred smooth, about 1-2 minutes total. Remove and set aside to cool, 5-7 minutes.
3. Add the granulated sugar and using a hand mixer, blend until combined. With the mixer running, add eggs one at a time blending well until smooth. Add the all-purpose flour, cocoa, and salt. Mix on low speed until combined. Pour the brownie layer into the prepared pan.
Middle layer
1. Place the Oreo cookies on top of the brownie layer, pressing them in slightly. Space them as evenly as possible, about 4 to a row.
Chocolate chip cookie layer
1. In a large mixing bowl and using a hand mixer, combine the brown sugar and butter. Add the eggs one at a time, mixing well with each addition. Mix in the vanilla extract.
2. Add the flour, baking soda, and salt. Mix until a thick batter forms. 4. Add the mini chocolate chips and mix on low speed until dispersed, or fold them in with a spatula. Spoon or scoop the batter on top of the Oreo layer and spread evenly with an offset spatula.
3. Bake for 50-60 minutes, or until the center is set. While still warm, sprinkle with more mini semisweet chips (about 2 tablespoons). 6. Allow the brookies to cool in the pan for 15-20 minutes or until firm enough to lift out of the pan using the overhanging parchment. Let cool completely.
4. Cut into bars using a large sharp chef’s knife, about 24 pieces.
Notes
Serving Suggestion: These bars are excellent served warm with ice cream on top. Just microwave for 20-30 seconds, then top with vanilla or coffee ice cream. They’re also good at room temperature when dunked in milk.
Bake Time: The bake time will vary depending on your 13×9 inch pan. Darker pan will cook faster and create crunchier edges. A ceramic or Pyrex dish may take longer to cook through.
Freezer Instructions
Allow the brookies to cool completely before freezing.
Wrap individual bars or the entire slab tightly in plastic wrap, then in aluminum foil, or store in an airtight container.
Freeze for up to 3 months. To serve, thaw at room temperature for about 30 minutes or warm in the microwave for a few seconds (10 seconds increments to avoid overheating).
- Prep Time: 25 minutes
- Cook Time: 50 minutes
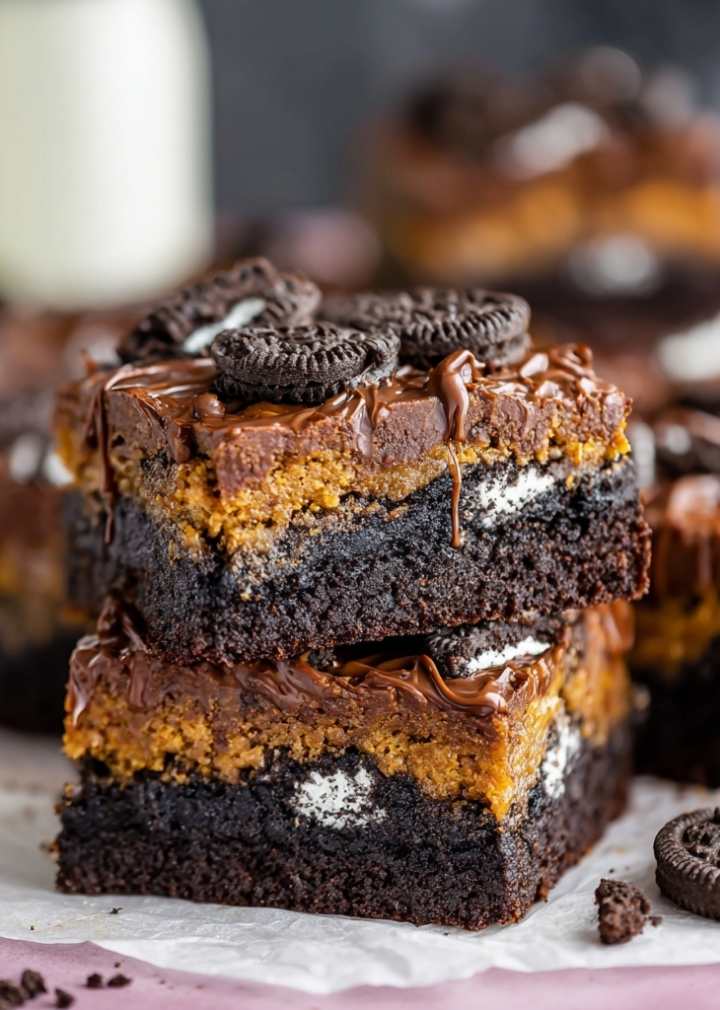
Oreo and Cookie Layers That Complete Brookie Bars
Once the brownie layer sits in the pan, the Oreo layer takes center stage. I place whole Oreos gently across the surface, pressing them just enough so they stay in place. Ultimate Oreo Brownie Bars benefit from even spacing, which helps each slice hold together cleanly. The Oreos add crunch and a slight creaminess that contrasts beautifully with the brownie base.
The cookie dough layer finishes the bars. It should feel soft and scoopable, not stiff. I drop small portions over the Oreos and gently spread them, allowing some Oreo edges to peek through. During baking, the cookie layer settles naturally and bonds with the Oreo layer beneath it. This method mirrors what I use in other Brookie Layered Bars and layered dessert favorites.
Together, these layers create the balance that defines Ultimate Oreo Brownie Bars. Each bite delivers structure, contrast, and comfort without feeling heavy.
How to Make Ultimate Oreo Brownie Bars Step by Step
Brookie Layered Bars Assembly Tips
Ultimate Oreo Brownie Bars come together smoothly when you focus on order and balance. I always start by preparing each layer before assembling. That approach keeps the process calm and prevents rushed steps. Once the brownie batter sits evenly in the pan, I place the Oreos gently across the surface. Spacing matters here because evenly placed Oreos help Ultimate Oreo Brownie Bars slice clean later.
When adding the cookie dough, I avoid spreading it all at once. Instead, I drop small portions across the Oreos and press them lightly. This method allows the cookie layer to settle naturally during baking without sinking into the brownie base. Brookie Layered Bars work best when the layers stay distinct yet connected. That balance creates contrast without separation.
I also line the pan with parchment paper before assembling. It helps lift the bars out cleanly and protects the layers from breaking. These small steps reflect the same techniques I rely on when making layered dessert bars and structured brownie recipes that need clean edges.
Baking Time, Pan Size, and Texture Control
Baking Ultimate Oreo Brownie Bars requires attention rather than speed. I use a standard square pan because it supports even thickness across all layers. A consistent pan size helps the brownie layer bake fully while allowing the cookie layer to soften without drying out.
I bake Ultimate Oreo Brownie Bars until the edges look set and the center feels slightly soft when gently pressed. The cookie layer should look just baked, not browned. Because layered desserts continue to firm as they cool, pulling them out at the right moment keeps the bars rich and tender.
Cooling matters just as much as baking. I let the bars cool fully in the pan before slicing. This step allows the layers to bond and settle. When sliced too early, Brookie Layered Bars can crumble or lose definition. Patience rewards you with clean layers and balanced texture in every piece.
Ultimate Oreo Brownie Bars Variations, Storage, and Serving
Ultimate Oreo Brownie Bars Variations You Can Try
Ultimate Oreo Brownie Bars adapt easily, which makes them ideal for repeat baking. When I want extra richness, I use double-stuffed Oreos in the center layer. They add more cream and create a thicker contrast between the brownie and cookie layers. For deeper chocolate flavor, I mix dark chocolate chips into the cookie dough. That addition pairs well with the brownie base without overpowering it.
You can also adjust the cookie layer texture. A slightly softer dough creates gentler Brookie Layered Bars, while a firmer dough holds sharper edges. Sometimes I swirl a small amount of peanut butter into the brownie layer for warmth and balance. These variations follow the same approach I use in adaptable bar desserts and layered treats that stay familiar while still feeling fresh. Ultimate Oreo Brownie Bars welcome creativity without losing their structure.
Storing, Freezing, and Serving Brookie Layered Bars
Ultimate Oreo Brownie Bars store well when handled with care. I keep them in an airtight container at room temperature for up to three days. This method keeps the cookie layer soft and the brownie layer rich. If the kitchen runs warm, refrigeration works too. Just allow the bars to sit out briefly before serving so the layers relax.
Freezing works beautifully for Brookie Layered Bars. I slice the bars first, then wrap them individually. This approach makes it easy to thaw only what you need. When serving, clean slices matter. I use a sharp knife and wipe it between cuts. Ultimate Oreo Brownie Bars look best when the layers stay visible, which makes them feel special even without decoration.
Can I make Ultimate Oreo Brownie Bars ahead of time?
Yes, Ultimate Oreo Brownie Bars work well for advance baking. The layers hold their texture and flavor for several days.
Do Brookie Layered Bars need to be refrigerated?
They don’t require refrigeration, but chilling helps with clean slicing and longer storage.
Can I use boxed brownie mix for Ultimate Oreo Brownie Bars?
You can, but homemade batter gives better structure and flavor for layered bars.
Why did my cookie layer bake faster than expected?
Cookie dough spreads and sets quickly, so watch baking time closely and remove the bars when the center still feels soft.
Ultimate Oreo Brownie Bars bring together everything I love about comfort baking. They balance structure and softness, familiarity and excitement. Each layer tells part of the story, from the rich brownie base to the crunchy Oreo center and the gentle cookie top. These Brookie Layered Bars remind me why baking feels personal. It isn’t just about dessert. It’s about creating something steady, shareable, and deeply satisfying. Ultimate Oreo Brownie Bars earn their place not just on the table, but in the memories made around it.