

Ninja Creami coffee ice cream isn’t just a dessert—it’s an experience that wraps you in creamy comfort and wakes you up with bold, rich coffee vibes.
I still remember the first time I fell in love with dessert. It was during my pregnancy, and it started with one magical slice of red velvet cake. That bite didn’t just satisfy a craving—it sparked a deep, delicious obsession that changed everything. Since then, my kitchen has become a playground of memories and flavors, a place where sugar meets storytelling. And that’s what makes every scoop, swirl, and spoonful in my home more than just a recipe.
What makes this Ninja Creami coffee ice cream so special? It’s ultra-smooth, ultra-flavorful, and totally customizable. Whether you like it bold and rich or mellow and sweet, you’re in complete control. Plus, it’s a lighter version of the classic favorite, so you can indulge without feeling heavy.

Let’s dive in—because you’re just a few spins away from the creamiest, most comforting coffee ice cream of your life.
Don’t miss our Frozen & Ice Cream collection for more frosty, creamy treats fresh from my messy, magical kitchen.
Table of Contents
Why Ninja Creami Coffee Ice Cream Deserves the Spotlight
What Makes Ninja Creami Coffee Ice Cream Unique
When most people hear “coffee ice cream,” they picture expensive pints with stylish labels and sugar levels that could rival a candy store. But Ninja Creami coffee ice cream made at home? That’s a whole new experience.
The Ninja Creami doesn’t just freeze—it transforms simple ingredients into creamy, rich perfection. With this machine, you can customize everything: sweetness, coffee intensity, creaminess, and even consistency. It gives you full control to create the perfect scoop every time.
Whether you lean toward bold espresso or smooth decaf, this homemade Ninja Creami coffee ice cream delivers a flavor-packed experience that tastes like your favorite iced coffee—but better. It’s cool, creamy, and completely crave-worthy.
And the best part? It’s indulgent without being heavy. This recipe skips the processed junk and uses just four clean ingredients, making it a smart and satisfying choice.
Print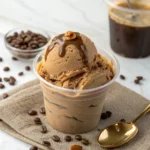
Irresistible Ninja Creami Coffee Ice Cream Recipe You’ll Absolutely Love
- Total Time: 24 hours
- Yield: 2 1x
Description
This creamy Ninja Creami coffee ice cream is a dream come true for coffee lovers. Made with just four ingredients, it’s simple to whip up and bursting with bold, rich flavor. Perfectly smooth, refreshing, and completely customizable.
Ingredients
1¾ cup 2% milk, Fairlife is my preferred
3 tbsp maple syrup or honey
1 tbsp instant coffee
1 tsp vanilla extract
Instructions
1. Add milk, instant coffee, maple syrup, and vanilla extract to the Ninja Creami pint container.
2. Whisk vigorously or use a coffee frother or immersion blender to fully blend the ingredients.
3. Place the ice cream container in the freezer for 24 hours.
4. Remove the lid and place container into the Ninja Creami machine. Press the Lite Ice Cream button and spin.
5. After the first spin, the ice cream will likely appear crumbly. Don’t worry—press the Re-spin button up to two more times to achieve a smooth, creamy consistency.
6. Serve immediately with your favorite ice cream toppings!
Notes
For a stronger coffee flavor, add an additional 1 tsp of instant coffee.
If you’re caffeine-sensitive or making this at night, use decaf instant coffee.
Use any milk of choice, but Fairlife 2% yields a rich and creamy texture.
- Prep Time: 5 minutes
- Category: Dessert
- Method: Ninja Creami
- Cuisine: American
Nutrition
- Serving Size: 1
- Calories: 199
- Sugar: 29g
- Sodium: 101mg
- Fat: 4g
- Saturated Fat: 3g
- Unsaturated Fat: 1.2g
- Trans Fat: 0.2g
- Carbohydrates: 32g
- Protein: 7g
- Cholesterol: 17mg
Keywords: Ninja Creami, coffee ice cream, homemade ice cream, 4-ingredient recipe
How to Master Creaminess with Just Four Ingredients in Ninja Creami Coffee Ice Cream
Milk Makes the Magic: Pick Your Perfect Base
If you’re aiming for smooth, café-quality Ninja Creami coffee ice cream, the milk you use matters more than you might think.
Texture hinges on fat content. Higher-fat milks produce a silkier consistency, while lower-fat options can lead to a more icy finish. My personal favorite is Fairlife 2% milk—it’s high in protein, ultra-filtered, and thicker than standard milk, giving your ice cream that indulgent creaminess without going overboard.
Not a fan of dairy? Or looking to lighten things up? No problem. Here are some popular milk choices and what they bring to the table:
- Whole milk – Smooth and full-bodied
- Half-and-half or heavy cream – The richest, most dessert-like option
- Skim or almond milk – Lower in fat, but slightly less creamy
- Oat, soy, or coconut milk – Solid dairy-free alternatives, each with a unique finish
Tip: For plant-based versions of Ninja Creami coffee ice cream, full-fat coconut or oat milk tends to produce the creamiest results.
Milk sets the tone—get it right, and everything else will fall into place.
Choose Your Coffee Wisely: Flavor First
Coffee is the flavor star in Ninja Creami coffee ice cream, so your choice here makes a major impact.
Instant espresso powder is ideal if you want bold flavor without any hassle. It mixes seamlessly and brings out that deep, roasted taste. I recommend using about a tablespoon to hit the sweet spot of flavor without overpowering.
Here’s a quick rundown of coffee types you can use:
| Coffee Option | Highlights | Suggestions |
|---|---|---|
| Instant espresso/coffee | Strong flavor, zero prep | Best for fast, bold results |
| Brewed espresso or coffee | Softer taste, aromatic | Chill before mixing to avoid icy texture |
| Decaf coffee | Full taste, no caffeine | Great for kids or late-night snacking |
Extra Tip: Want to go mocha? Add a little cocoa powder for a chocolate-coffee twist.
Coffee syrup can also be used—especially if it’s already in your pantry. Just remember to slightly reduce any other sweetener to avoid overdoing it.
Ultimately, every batch of Ninja Creami coffee ice cream is built on small choices—but those four ingredients work together to create a spoonful of pure magic.
Step-by-Step Guide to Making Ninja Creami Coffee Ice Cream
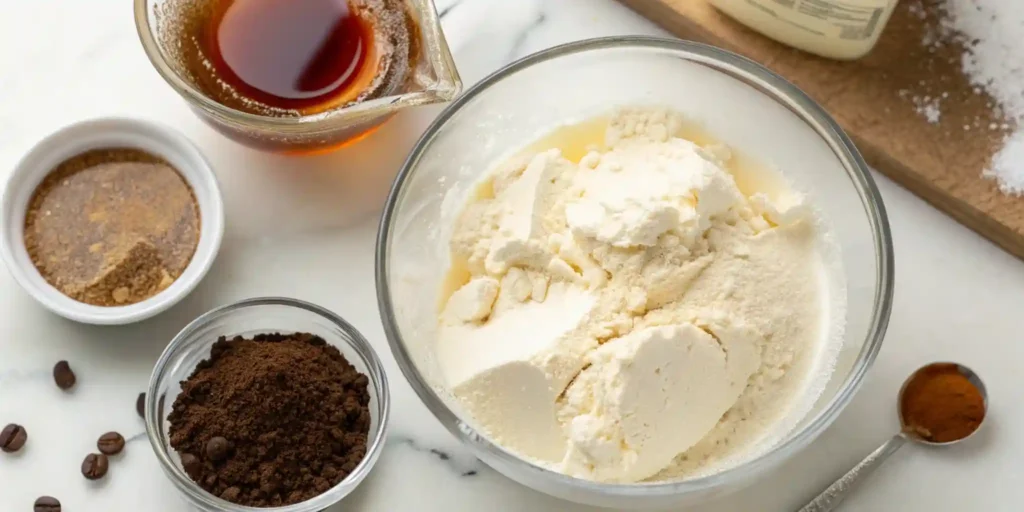
Step 1: Build Your Custom Base
To get that dreamy texture in your Ninja Creami coffee ice cream, it all begins with a smooth, well-mixed base.
Here’s what to pour into your Ninja Creami pint:
- 1¾ cups of your chosen milk (Fairlife 2% gives great creaminess)
- 1 tablespoon of instant espresso or coffee granules
- 3 tablespoons of maple syrup, or a sweetener that fits your needs
- 1 teaspoon vanilla extract
Blend until fully combined. A handheld frother or stick blender is ideal for this—it helps fully dissolve the coffee granules and creates a silky consistency. The smoother the mix, the creamier your final scoop will be.
Need more flavor? Add a little more espresso powder. Crave more sweetness? Add another dash of syrup. This base is yours to tweak.
Step 2: Freeze Flat for 24 Hours—No Shortcuts
After blending, secure the lid and place your pint in the freezer. This part is non-negotiable: the mixture must freeze undisturbed for a full 24 hours.
Shorter freeze times can ruin the result, leading to uneven textures—even after multiple spins. That’s because the Creami shaves through a fully frozen block. Anything soft in the middle can cause problems during processing.
Freezing Tip: Make sure your container sits flat and undisturbed in the freezer. Avoid crowding it between frozen foods or setting it on an angle.
With proper freezing, your Ninja Creami coffee ice cream will churn into a smooth, scoopable, café-style treat you’ll want to make again and again.
Using the Ninja Creami Machine Like a Pro
Lite Ice Cream vs. Other Presets: Which One Works Best
Alright, your base is frozen solid. It’s time for the real fun: watching the Ninja Creami coffee ice cream come to life.
Once your pint has frozen for a full 24 hours (no shortcuts, remember?), remove the lid and place the container into your Ninja Creami machine. Lock it in place, twist that top shut, and get ready to choose your setting.
Now, the big question: Which program should you use?
For this lighter milk-based recipe, the “Lite Ice Cream” setting is your best friend. It’s specifically designed for bases that don’t contain heavy cream or full-fat dairy. It moves a little slower and more gently through the ice crystals, giving you a smoother result without over-processing.
You could use “Ice Cream” or “Gelato,” but in most cases, they’re too aggressive for lighter recipes and could lead to a crumbly texture.
Once you press Lite Ice Cream, the machine will do its thing for about 90 seconds. It’ll get loud (don’t worry—that’s normal). When it’s done, pop that lid open and take a look.
Will it be perfect on the first try?
Probably not.
Which brings us to…
The Secret to Creaminess: Why Multiple Spins Matter
Here’s the honest truth about Ninja Creami coffee ice cream: it usually takes more than one spin to get it just right—especially when using lower-fat milk or plant-based alternatives.
After your first spin, the texture will likely be crumbly or shaved—not quite scoopable yet. But don’t panic. That’s where the magic button comes in: Re-Spin.
Press Re-Spin once, check the texture. Still crumbly? Hit it one more time. Usually, two spins after the original cycle (that’s three spins total) will give you the ultra-smooth, dreamy texture you’re going for.
Still not there? Add 1 tablespoon of milk to the pint and Re-Spin again. That little bit of liquid helps bring everything together like a charm.
Add them after your final spin and press the Mix-In button. The machine will fold them in without pulverizing.
And just like that, your smooth, rich, customizable Ninja Creami coffee ice cream is ready for its big moment.
Customizing Your Coffee Ice Cream Flavor
Flavor Boosters: From Cocoa to Mocha to Vanilla
Now that you’ve nailed the creamy base, it’s time to have some fun. One of the best things about Ninja Creami coffee ice cream is how easy it is to customize. You can take that bold, rich coffee base and give it any spin (pun intended) your cravings demand.
Want to lean into those café vibes? Try these delicious flavor boosters:
- Mocha Magic: Add ½ tablespoon of unsweetened cocoa powder to your base before freezing for a chocolate-coffee combo that’ll make your local barista jealous.
- Vanilla Latte Vibes: Pump up the vanilla extract to 1½ teaspoons and toss in a dash of cinnamon for a warm, spiced twist.
- Salted Caramel Swirl: After spinning, drizzle in your favorite caramel sauce and re-spin or use the Mix-In function for ribbons of gooey sweetness.
You’re in control of every spoonful. Whether you want bold espresso flavor or a gentler, dessert-style vibe, this recipe adapts like a dream.
And if you like a deeper flavor profile, consider coffee syrup instead of instant coffee and sweetener. It’s a New England gem, and it adds a uniquely rich sweetness to your coffee ice cream.
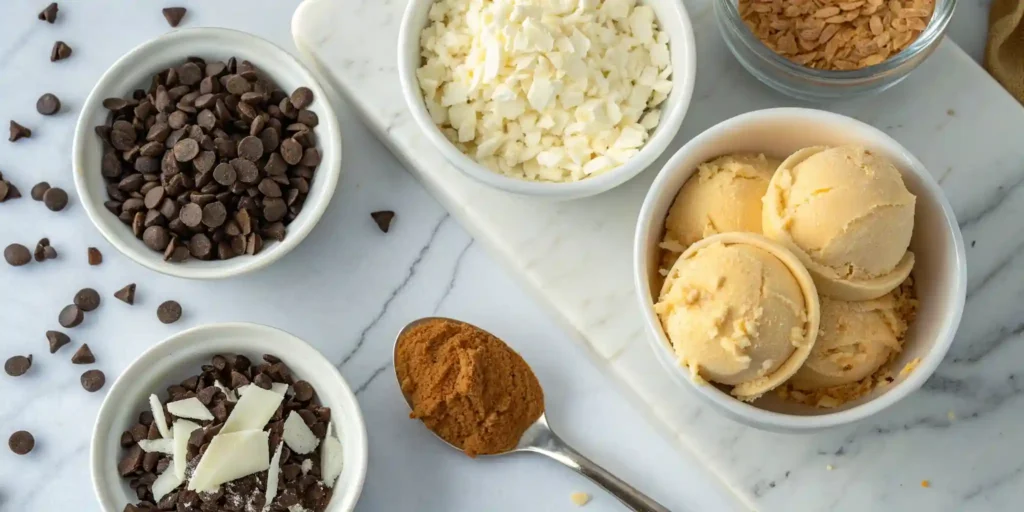
Texture Add-Ins: Chunks, Chips, and Toppings Galore
Let’s talk texture—because ice cream should never be boring.
Once your Ninja Creami coffee ice cream has hit that perfectly creamy state, you can stir in (or spin in) just about anything you want:
| Add-In | Why You’ll Love It |
|---|---|
| Mini chocolate chips | Classic crunch and perfect with mocha variations |
| White chocolate chunks | Sweet, buttery contrast to the coffee |
| Toasted coconut flakes | For a tropical twist with some chew |
| Crushed Oreos or cookies | Who needs a cone when the cookie’s in the scoop? |
| Sprinkles or candy bits | Because fun is always in fashion |
Use the Mix-In function if you’re adding chunky goodies right in the machine. Or just stir them in by hand for more control.
Want to go full fancy? Serve with a dollop of whipped cream, a dusting of cinnamon, or a drizzle of chocolate syrup. This coffee ice cream is your canvas—go wild.
Common Problems & Quick Fixes
Why Is My Ice Cream Crumbly?
Let’s be real—there’s nothing worse than digging into your freshly spun Ninja Creami coffee ice cream only to find… ice flakes and crumbles. It’s frustrating, but totally fixable.
If your ice cream comes out crumbly after the first spin, don’t worry—it’s not ruined. This is super common with lighter milk bases or low-fat ingredients. The Ninja Creami works best when there’s enough fat to bind the ingredients smoothly. Since we’re using 2% milk (or plant-based milk), it might take a little extra TLC to get it creamy.
Here’s what to do:
- Hit the Re-Spin button—this usually softens things up.
- Still not there? Add 1 tablespoon of milk and spin again. The added moisture helps pull the mixture together.
- Try not to overfill or underfill the container. Stick to the Max Fill line on the pint, or you’ll end up with uneven freezing.
This little hiccup doesn’t mean your coffee ice cream isn’t working—it just means your Ninja Creami is asking for a second chance to shine.
Troubleshooting Texture, Sweetness, and Coffee Strength
Some people like their Ninja Creami coffee ice cream bold and espresso-heavy. Others want it smooth, mild, and sweet. The beauty of this recipe? You can tweak it to fit your vibe—even after you’ve frozen it.
If your ice cream is:
- Too strong: Next time, reduce the instant coffee by ½ teaspoon or balance with extra vanilla extract.
- Too sweet: Use a lighter hand with maple syrup, or sub in stevia or monk fruit for a gentler sweetness.
- Not creamy enough: Add a splash of half-and-half to your base before freezing, or stir in a bit of heavy cream after spinning for an indulgent finish.
Still not satisfied with the flavor? Pour your melted base back into the blender, remix your flavorings, and refreeze it. Yes, it takes a little extra time—but this isn’t store-bought.
Don’t miss our lemon cream cheese dump cake recipe for another rich and creamy dessert you’ll love.
Healthy Variations for Ninja Creami Coffee Ice Cream
Low-Carb, Sugar-Free, and Protein-Boosted Options
Trying to enjoy dessert while staying within your health goals? With the right swaps, Ninja Creami coffee ice cream can easily fit into low-carb, sugar-free, and protein-focused lifestyles—without sacrificing flavor or texture.
Here’s how to tailor it:
- Replace maple syrup with monk fruit, erythritol, stevia, or other sugar-free sweeteners. They offer sweetness without added carbs or spikes in blood sugar.
- Choose unsweetened almond or coconut milk for a lighter, dairy-free base.
- Want to add protein? Mix in a scoop of vanilla protein powder or use a ready-made protein coffee drink (like Premier Protein Café Latte) as part of your liquid. Just reduce the milk slightly to keep the mixture pint-safe.
Not only will this version of Ninja Creami coffee ice cream fit your macros, but it still delivers on flavor.
| Sweetener | Ideal For | Details |
|---|---|---|
| Stevia | Keto, sugar-free diets | Super sweet—use less than sugar |
| Monk Fruit | Low-carb needs | Clean taste, closest to sugar flavor |
| Erythritol | Low-calorie treats | Doesn’t raise blood sugar |
| Sugar-Free Syrups | Quick mixing | Comes in various flavors, easy to blend |
Yes, you can indulge while staying on track.
Plant-Based Milks and Protein Shake Alternatives
Looking for a scoop that works as both dessert and fuel? Swap regular milk with a protein shake—coffee-flavored ones work especially well. Premier Protein Café Latte, for example, delivers creaminess and a caffeine kick in one.
Prefer plant-based? These options work beautifully:
- Full-fat oat milk – Creamy texture with mild sweetness
- Coconut milk – Rich and tropical, ideal for thicker scoops
- Soy milk – Naturally higher in protein and neutral in taste
If you go the non-dairy route, a couple of re-spins usually brings out that classic Creami texture.
What makes Ninja Creami coffee ice cream truly amazing is its flexibility. Whether you’re low-carb, dairy-free, or just experimenting with new flavors, this recipe adapts to your lifestyle without compromise.
Flavor Variations Every Ninja Creami Coffee Ice Cream Lover Should Try
Decaf Magic for Late-Night Cravings
You’re not alone. One of the best parts about creating Ninja Creami coffee ice cream at home is full control over every ingredient—caffeine included.
Just switch out traditional instant coffee for a decaf version to make a scoop that’s rich in coffee flavor, but mellow enough for bedtime. This option is perfect for winding down after dinner, sharing with kids, or avoiding that midnight buzz.
Pro tip: a tiny pinch of salt in your mix can deepen the flavor of decaf coffee, enhancing those warm, roasted notes in a subtle but delicious way.
Creative Mix-Ins to Keep Things Interesting
Once you’ve mastered your base recipe, the fun begins. Try these inventive upgrades to put your own spin on Ninja Creami coffee ice cream:
- Mocha Infusion: Add a tablespoon of unsweetened cocoa powder to your mixture before freezing. It delivers a rich, coffee-meets-chocolate flavor that’s pure indulgence.
- Coffee Syrup Ribbons: After your final spin, fold in a swirl of your favorite coffee syrup. It adds a sweet, layered touch—like your favorite coffeehouse drink in frozen form.
- Protein-Enhanced Café Creami: Use a coffee-flavored protein shake instead of milk for a dessert that fuels your day. Premier Protein’s latte flavor works especially well and gives the ice cream a thick, creamy consistency.
| Style | Ingredient Addition | Flavor Experience |
|---|---|---|
| Mocha Scoop | Cocoa powder | Deep, smooth, chocolate-coffee |
| Swirled Sweet | Coffee syrup (post-spin mix-in) | Sweet, rich, layered |
| Protein Punch | Protein coffee shake | Creamy, energizing, and filling |
Looking for a finishing touch? Top your scoop with espresso beans, cacao nibs, or a splash of coffee liqueur for a grown-up twist.
With endless options for customization, Ninja Creami coffee ice cream becomes more than just dessert—it’s your personal flavor playground.
Need more inspiration? Try the blueberry cheesecake rolls recipe next—it’s equally creative, customizable, and sure to satisfy your sweet tooth.
How to Save and Serve Ninja Creami Coffee Ice Cream Without Losing Flavor
Make Leftovers Just as Good as the First Scoop
So you made some seriously good Ninja Creami coffee ice cream, but didn’t eat the whole pint. Can you save it? Yes. Will it still be creamy when you go back for it? It can be—with a little help.
Here’s what to do so it stays just as smooth tomorrow as it was today:
- Store it in the original Creami pint you used—no need to transfer it.
- Make sure it lies flat in your freezer, and keep that lid on snug.
- When you’re ready for more, pop it back into the machine and run a re-spin.
Too firm? Add a small splash of milk (a tablespoon is enough) before spinning again. That bit of moisture softens things right up and brings back the creamy magic.
Want to get ahead? Make a few pints at once and freeze them. Then, whenever you’re in the mood, just re-spin and enjoy.
How to Serve It Like You’ve Got a Dessert Bar at Home
Yes, Ninja Creami coffee ice cream is amazing by itself—but if you want to have some fun with it, here are a few low-effort ways to make it look (and taste) even better:
- A light sprinkle of cocoa powder + dark chocolate curls
- A pour of chilled coffee or espresso = instant affogato
- On top of something warm—like a fresh brownie or muffin
- A touch of sea salt to cut through the sweetness
- Your favorite flavored drizzle—caramel, mocha, hazelnut, whatever works
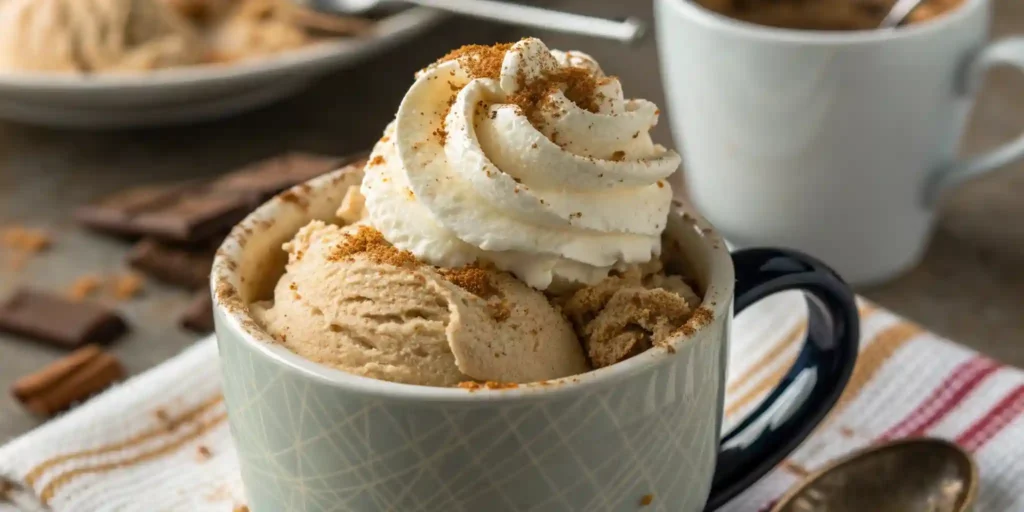
Bonus idea: Serve it in a coffee mug, top with whipped cream and a pinch of cinnamon. Dessert and presentation all in one.
The best part? Whether it’s your go-to weeknight treat or something for your guests, Ninja Creami coffee ice cream works every time—as long as you know how to store and serve it right.
Conclusion: A Scoop of Comfort You’ll Come Back to Again and Again
There’s something undeniably joyful about making Ninja Creami coffee ice cream from scratch. It’s not just the flavor—it’s the ritual. The anticipation. The freedom to tweak, taste, and totally own your creation.
With just four simple ingredients, a bit of patience, and the power of the Ninja Creami, you’ve got a go-to dessert that’s comforting, customizable, and endlessly delicious. Whether you love bold espresso vibes or creamy, dreamy decaf, this coffee ice cream truly delivers.
And unlike the pint you grabbed off a grocery shelf, this one tells your story. Your ingredients. Your favorite mix-ins. Your kind of sweetness.
So here’s your sign: clear a space in the freezer, grab your favorite mug, and start spinning your way into something amazing. Because this Ninja Creami coffee ice cream isn’t just another dessert—it’s a memory in the making.
Looking for more desserts that make you feel something ? Don’t miss gems like champurradas or our watermelon cake for your next sweet adventure.
Do I really have to wait 24 hours for Ninja Creami?
Yes, you really do. We know—it’s hard to wait when you’re craving Ninja Creami coffee ice cream, but the full 24-hour freeze is key to that perfectly creamy texture. The machine is designed to work with a completely frozen base. Anything less and you’ll end up with ice shards instead of silky scoops. Be patient—it’s worth every second.
What are the downsides of the Ninja Creami?
While the Ninja Creami is a dessert game-changer, it’s not without quirks. The most common downside is the required freeze time—there’s no instant gratification here. Also, lighter recipes like this Ninja Creami coffee ice cream often need multiple spins to get creamy. And if you’re low on freezer space, those pint containers can stack up quick. Still, it’s a small trade-off for endless ice cream freedom.
Do you have to respin Ninja Creami every time?
Do you have to respin Ninja Creami every time?
Not every single time—but when it comes to coffee ice cream made with lower-fat milk or plant-based alternatives, yes, respinning is usually part of the process. One regular spin and two re-spins is a common combo. Think of it as giving your dessert time to evolve into its most delicious form. The payoff? That signature creamy consistency we all crave.
Can you put coffee in the Ninja Creami?
Absolutely. In fact, that’s exactly what makes Ninja Creami coffee ice cream so special. You can use instant coffee, espresso powder, or even brewed coffee (cooled, of course). The machine handles coffee flavor beautifully—so whether you’re after bold and robust or smooth and mellow, it’s all possible with the right base mix.
Did this dessert happen in your kitchen?
my review
It was very delicious